深入组件
注册组件
注册组件的方式包括局部注册和全局注册
局部注册即通过显示导入的方式使用组件
全局注册通过 app.component 实现,注册后可在任意组件的模板中使用
app
  .component('ComponentA', ComponentA)
  .component('ComponentB', ComponentB)
  .component('ComponentC', ComponentC)
全局注册优点是方便,无需在此导入
缺点是组件无法被 树摇,并且会使得组件之间的依赖关系混乱
Props
一些比较特别的写法
<!-- 仅写上 prop 但不传值,会隐式转换为 `true` -->
<BlogPost is-published />const post = {
id: 1,
title: 'My Journey with Vue'
}
<BlogPost v-bind="post" />
// 等价于
<BlogPost :id="post.id" :title="post.title" />基于类型的 prop/emit 声明
const props = defineProps<{
  foo: string
  bar?: number
}>()

const emit = defineEmits<{
  (e: 'change', id: number): void
  (e: 'update', value: string): void
}>()

// 3.3+:另一种更简洁的语法
const emit = defineEmits<{
  change: [id: number] // 具名元组语法
  update: [value: string]
}>()
组件 v-model(3.4+)
v-model 配合 defineModel 可以在组件上实现双向绑定
<!-- Parent.vue -->
<Child v-model="countModel" />
<!-- 也可以传递一个参数 -->
<!-- <Children v-model:title="bookTitle" /> -->

<!-- Children.vue -->
<script setup>
const model = defineModel()
// 接收参数
// const title = defineModel('title')
</script>

<template>
  <input v-model="model" />
</template>
带修饰符的的 v-model
自定义修饰符
<!-- Parent.vue -->
<MyComponent v-model.capitalize="myText" />

<!-- Children.vue -->
<script setup>
const [model, modifiers] = defineModel({
  set(value) {
    if (modifiers.capitalize) {
      return value.charAt(0).toUpperCase() + value.slice(1)
    }
    return value
  }
  // get(){}
})
</script>

<template>
  <input type="text" v-model="model" />
</template>
透传 Attributes
组件接收到的 attribute 如果没有被声明为 props 或 emits,如果组件时以单元素为根做渲染,
这些没有被 消费 的 attribute 将会被自动添加到根元素上
如果其根节点为另一组件,这些 attribute 会继续向下传递
可以通过 defineOptions 禁用自动继承 attribute
<script setup>
defineOptions({
  inheritAttrs: false
})
</script>
这些透传过来的 attribute 可以通过 $attrs 访问到
<div class="btn-wrapper">
  <button class="btn" v-bind="$attrs">Click Me</button>
</div>
如果组件是多个根节点,需要通过以上方式显示绑定 attribute ,否则将抛出警告
同时也可使用 useAttrs() 访问所有透传 attribute,但是这里访问到的对象并不是响应式的,无法通过侦听器监听
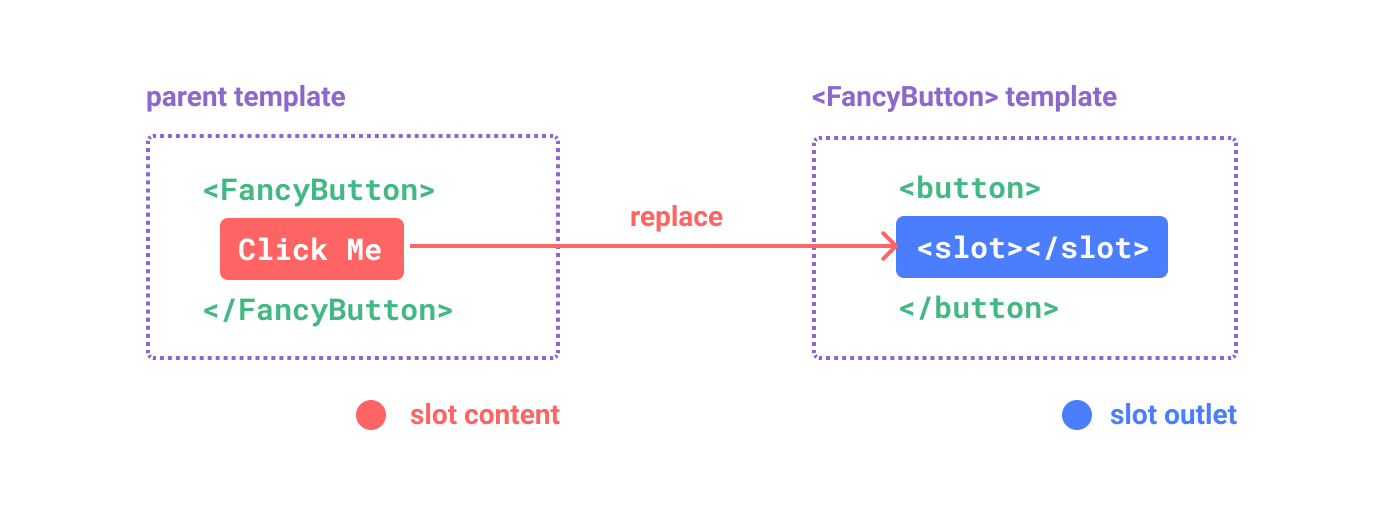
插槽
可以通过 <slot> 元素提供一个插槽出口,标识了父元素提供的插槽内容渲染位置
默认内容
<button type="submit">
  <slot>
    Submit <!-- 默认内容 -->
  </slot>
</button>
具名插槽
利用 slot 的 name 属性配合 v-slot 建立多个插槽间的对应关系
v-slot 可以简写为 #
<!-- BaseLayout.vue -->
<div class="container">
  <header>
    <slot name="header"></slot>
  </header>
  <main>
    <!-- default 插槽 -->
    <slot></slot>
  </main>
  <footer>
    <slot name="footer"></slot>
  </footer>
</div>

<!-- Container -->
<BaseLayout>
  <template v-slot:header>
    <!-- header 插槽的内容放这里 -->
  </template>
</BaseLayout>
条件插槽
可通过 $slot 配合 v-if 实现条件插槽
<template>
  <div class="card">
    <div v-if="$slots.header" class="card-header">
      <slot name="header" />
    </div>
  </div>
</template>
动态插槽
<base-layout>
  <template #[dynamicSlotName]>
    ...
  </template>
</base-layout>
作用域插槽
子组件可将自身状态传递给插槽,供父组件渲染使用
通过 v-slot 接收插槽 props(除去 name)
<!-- <MyComponent> 的模板 -->
<div>
  <slot :text="greetingMessage" :count="1"></slot>
</div>

<MyComponent v-slot="slotProps">
  {{ slotProps.text }} {{ slotProps.count }}
</MyComponent>

<!-- 具名作用域插槽 -->
<MyComponent>
  <template #header="headerProps">
    {{ headerProps }}
  </template>
</MyComponent>
无渲染组件
一些组件可能只包括了逻辑而不需要自己渲染内容,视图输出通过作用域插槽全权交给了消费者组件
<MouseTracker v-slot="{ x, y }">
  Mouse is at: {{ x }}, {{ y }}
</MouseTracker>
依赖注入
为了解决 prop 逐级透传 的问题,可以通过 provide 和 inject 来构造上下文
<!-- Provider -->
<script setup>
import { provide } from 'vue'

provide(/* 注入名 */ 'message', /* 值 */ 'hello!')
</script>

<!-- Consumer -->
<script setup>
import { inject } from 'vue'

const message = inject('message',' 默认值 ')
// 也可以通过工厂函数构造默认值,第三个参数表示默认值应被当作一个工厂函数
// const value = inject('key', () => new ExpensiveClass(), true)
</script>
配合响应式
<!-- 在供给方组件内 -->
<script setup>
import { provide, ref } from 'vue'

const location = ref('North Pole')

function updateLocation() {
  location.value = 'South Pole'
}

provide('location', {
  location,
  updateLocation
})
</script>


<!-- 在注入方组件 -->
<script setup>
import { inject } from 'vue'

const { location, updateLocation } = inject('location')
// provide('read-only-count', readonly(count)) 可以使用 readonly 限制数据仅读
</script>

<template>
  <button @click="updateLocation">{{ location }}</button>
</template>
异步组件
使用 defineAsyncComponent 定义异步组件,实现按需加载
<script setup>
import { defineAsyncComponent } from 'vue'

const AdminPage = defineAsyncComponent(() =>
  import('./components/AdminPageComponent.vue')
)
</script>

<template>
  <AdminPage />
</template>
配合 Suspense 渲染加载状态